| PIMS Logon Procedure |
|
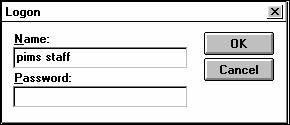
You need to enter a logon name and a password in order to access PIMS. The default logon name and password will be provided to you by your PIMS technical assistant. Beginning in version 5, it is possible to create individual accounts with custom security settings. |
| |
|
|
| |
|
 |
| |
|
|
| |
|
 |
| |
|
|
| Types of PIMS Windows |
|
The Program Information Management System (PIMS) uses three basic types of windows.
- Menus contain buttons that allow you to access other menus or data entry forms.
- Data Entry Forms allow you to enter, edit, add, delete and view data in the PIMS database.
- Reports display summaries of information you have entered into PIMS through the data entry forms.
|
| |
|
|
| Understanding PIMS Data |
|
PIMS stores data so it can be retrieved, analyzed, and reported. You enter individual pieces of data into data entry fields. Together, information from several data entry fields regarding a single subject (for example, staff, hospital, community, participant, child) form a record. |
| |
|
|
| Navigating through the PIMS Windows |
|
To navigate through the fields in a form you may use the keyboard Tab key or use the mouse. It is recommended that you use the Tab key to better ensure that data is entered in sequence and no fields are skipped. |
| |
|
|
| Common Elements of PIMS Windows |
|
Certain common elements appear on windows throughout PIMS. Below you will find an explanation of each of these elements. These elements are highlighted on the figure that follows. |
| |
|
|
|
|
|
Window Element |
Description |
How to... |
Title Bar |
Lists the title of the window and the current process. |
|
Icon Button |
Reduces the window to an icon. |
Click the mouse button while the mouse pointer is on the button. |
Minimize/ Maximize Button |
Enlarges or reduces the window you are working on. |
Click the mouse button while the mouse pointer is on the button. |
Close Button |
Closes the window. |
Click the mouse button while the mouse pointer is on the button. |
Menu Bar |
Lists the menu options. |
Click the mouse button while the mouse pointer is on the menu option to open a pull-down list of commands. |
Tool Bar |
Lists the tool bar function icons. |
Click the mouse button while the mouse pointer is on the function icon. |
Header |
Displays the name of the window and optional window information. |
|
Pull-Down List |
Provides a list of options from which to select. |
Click the mouse button while the mouse pointer is on the down arrow (or hit F4) to display the options. Then to select the particular item, click once on that item. |
Field |
An empty area requiring new information or an area containing pre-populated information. |
- Place the mouse pointer in the empty field.
- Click on the mouse button.
- Type the required information.
|
Cursor |
Appears as a blinking line in the fields on a window. |
|
Option Button |
Indicates the option you want out of two or more choices. Only one option button can be selected at a time. |
Click the mouse button while the mouse pointer is on the option button. It turns gray when you click on it. |
Check Box |
Allows the user to select or deselect an option. |
Click the mouse button while the mouse pointer is on the box. |
Command Button |
Moves the user to the next steps in a process. |
Click the mouse button when the mouse pointer is on the button. |
Footer |
Displays the date and time of the last update to the data record. |
|
Navigation Button |
Moves to the next or previous record, or to the first or last record. |
Click the mouse button while the mouse pointer is on the button. |
Status Bar |
Provides a detailed description of the active field. |
|